-
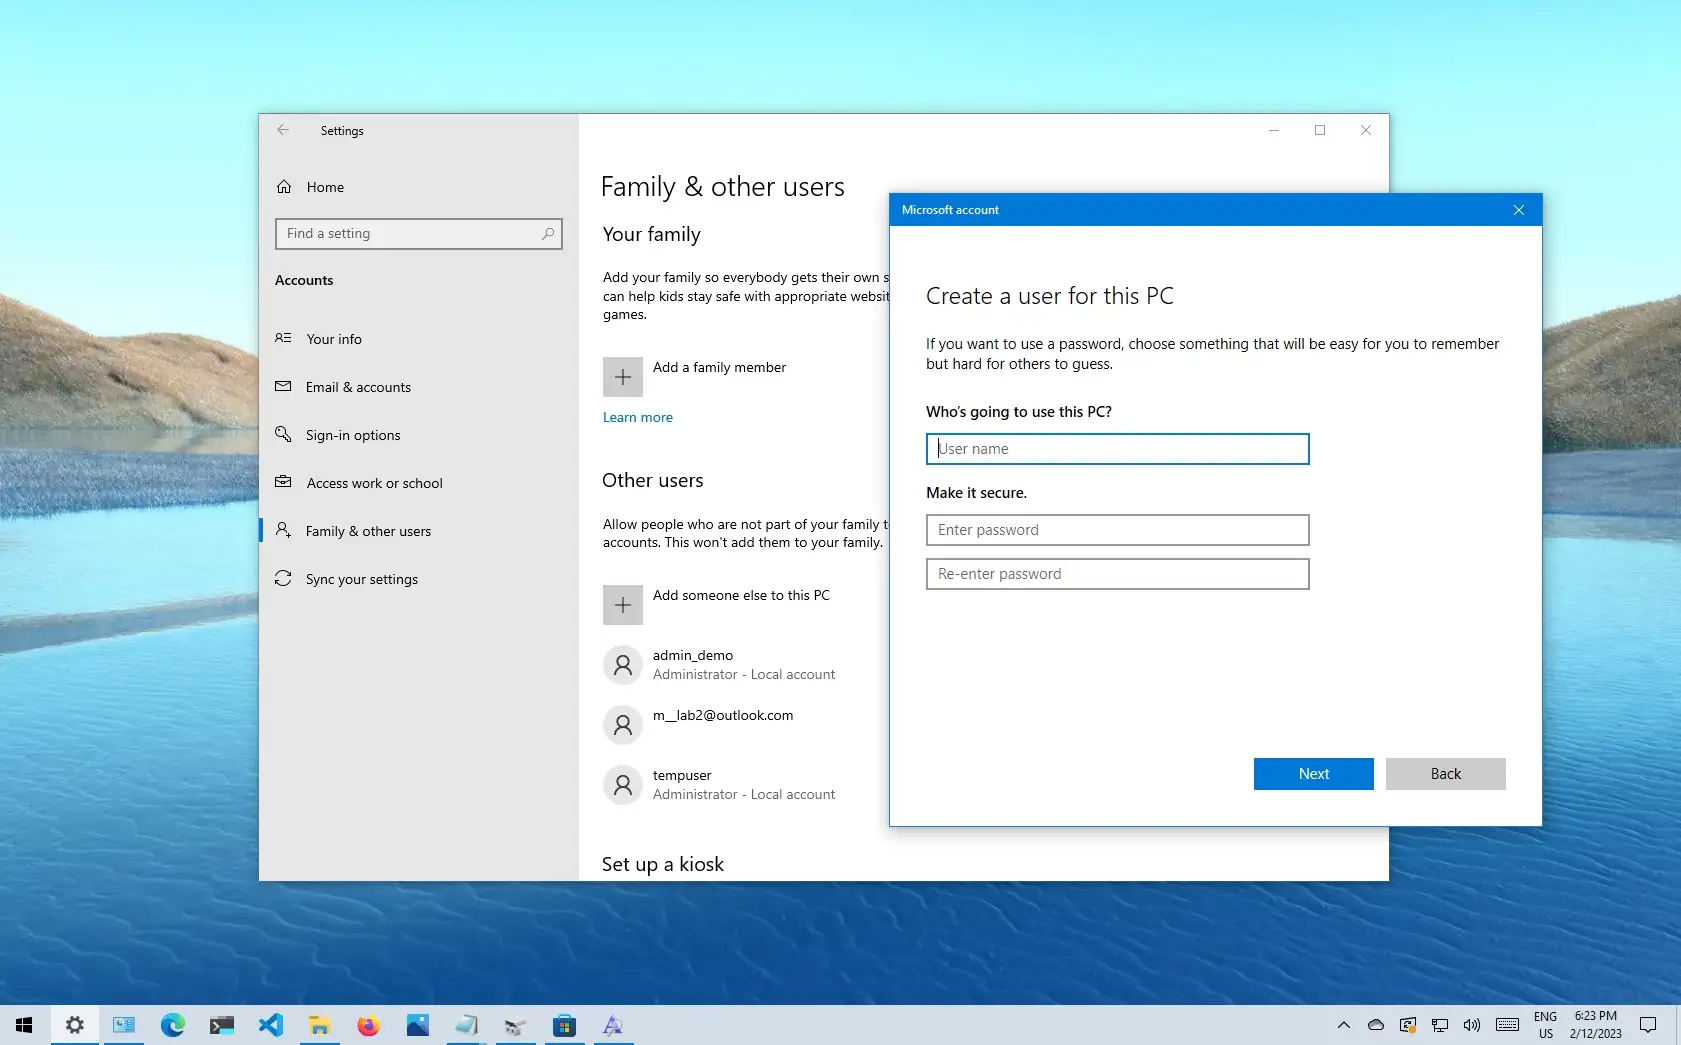
The easiest way to create a local account on Windows 10, open
Settings
>
Accounts
>
Family & other users
, click
Add someone else to this PC,
choose
I don t have this person s sign-in information,
select
Add a user without a Microsoft account,
and continue with the on-screen directions. -
Another way to create a local account on Windows 10 is to open
Command Prompt
(admin) and use the
net user USER_NAME PASSWORD /add
command. -
Or open
PowerShell
(admin) and run the
$Password = Read-Host -AsSecureString
and
New-LocalUser NEW_ACCOUNT_NAME -Password $Password -FullName USER_FULL_NAME -Description DESCRIPTION
commands to create a Windows 10 local account.
A local account can be created on a computer running Windows 10 in order to carry out any task. For a more private and secure experience, your files, settings, and preferences will stay locally, unlike when using a Microsoft account.
Since a Microsoft account is the recommended kind due to its advantages and syncing capabilities, you will usually find the local account type on businesses and less on residential PCs. But it’s still a great way to make more accounts or share a device with other people.
This tutorial will show you how to use the Settings app, Command Prompt, PowerShell, Computer Management, and even Netplwiz (User Accounts) to create a local account in Windows 10. This guide also describes how to create an administrator account and how to remove accounts from your device.
-
Create local account on Windows 10 from Settings
-
Create local account on Windows 10 from Command Prompt
-
Create local account on Windows 10 from PowerShell
-
Create local account on Windows 10 from Computer Management
-
Create local account on Windows 10 from netplwiz
Create local account on Windows 10 from Settings
Follow these simple steps to create a local user account in Windows 10:
Windows 10’s OpenSettings.
Select “Accounts.”
On Family & Other Users, click.
Click the “Add someone else to this PC” button under “Other users.”

Select the option that reads, “I don’t have this person’s sign-in information.”

Select the option to “Add a user without a Microsoft account.”

Verify the updated Windows 10 local account details under the “Create an account for this PC” section.
To retrieve the account in the event that the password is forgotten, create security questions and answers.

Press the “Next” button.
The new local account will appear under Other users once you’ve finished the steps. The sole drawback is that Windows 10 restricts its usability by creating each new account with normal rights for security reasons. You must switch the account type to administrator if you want the user to have additional rights to install the application and perform system modifications.
Change local account type from Settings
Use these procedures to switch the account type from standard to administrator:
Open the settings.
Select “Accounts.”
On Family & Others, click.
Choose the user account from the Other users section.
Click the button labeled “Change account.”

Choose the Administrator option from the Account type drop-down menu.

Press the “OK” button.
The account will have administrator rights to install apps and perform system modifications once you’ve finished the tasks.
Delete local account from Settings
Use these procedures to remove a local Windows 10 account and its contents:
Open the settings.
Select “Accounts.”
On Family & Others, click.
Choose the local account from the Other users section.
Press the “Delete” button.

To confirm the deletion of the account, click the Delete account and data option.

The system will remove the user account and data from the Windows 10 installation after you finish the instructions.
Create local account on Windows 10 from Command Prompt
It is much quicker to create a local account and change its settings using Command Prompt if you are accustomed to entering command lines.
Follow these instructions to create a local account from the Windows 10 Command Prompt:
LaunchStart.
Look up “Command Prompt,” then right-click on the first result and choose “Run as administrator.”
To create a new account, type the following command and hit Enter:
Make careful to enter the new user account’s credentials in the command by changing the user name and password.
(Selective) To add the newly formed account to the Administrators group, use the following command and hit Enter:

Make sure you include the account name you wish to add to the administrators group in place of USER_ACCOUNT in the command.
Signing out will reveal the new user account in the lower-left corner of the screen, allowing you to test the new modifications. After that, choose the new user account and log in.
Change local account type from Command Prompt
Use these procedures to switch the account type from standard to administrator in the Command Prompt:
LaunchStart.
Look up “Command Prompt,” then right-click on the first result and choose “Run as administrator.”
To include the newly formed account in the Administrators group, use the following command and hit Enter:

Make sure you include the account name you wish to add to the administrators group in place of USER_ACCOUNT in the command.
After completing the procedures, the profile will have administrative capabilities, granting the user unrestricted access to the device, the ability to install programs, and the ability to change system settings.
Delete local account on Windows 10 from Command Prompt
Follow these instructions to remove a Windows 10 local account from the Command Prompt:
LaunchStart.
Look up “Command Prompt,” then right-click on the first result and choose “Run as administrator.”
To remove the Windows 10 account, use the following command and hit Enter:

Make careful to modify USER_ACCOUNT for the account name you wish to remove in the command.
The user account and files will be deleted from the device once you have finished the instructions.
Create local account on Windows 10 from PowerShell
Use these instructions to set up a local PowerShell account on Windows 10:
LaunchStart.
Look up “PowerShell,” then right-click on the first result and choose “Run as administrator.”
Type the following command to temporarily store the password in a secure string inside the $Password variable and pressEnter:
Type the password for the new Windows 10 account and pressEnter.
Type the following command to create the new account with PowerShell and pressEnter:

In the command, make sure to changeNEW_ACCOUNT_NAMEfor the account name andUSER_FULL_NAMEfor the user s full name. Also, replaceDESCRIPTIONwith the description you want to use for the account.
Type the following command to add the Windows 10 account to the correct user group and pressEnter:
In the command, make sure to changeNEW_ACCOUNT_NAMEfor the account name. In the above command, we add the new account to theAdministratorsgroup, which gives the user full access to the computer. However, if you want the user to have limited access, you can add the account to theUsersgroup, making the account a Standard User.
Once you complete the steps, Windows 10 will add the new account to the device with full access using administrative privileges. Of course, this is unless you added the account to the Users group, in which case the account will be a limited standard account.
Connect new account to a Microsoft account
Using PowerShell should also be possible to create a user account connected to a Microsoft account with this command:New-LocalUser -Name “MicrosoftAccount\[email protected]” -Description “Microsoft account description”. However, a bug still returns this message when running the command:New-LocalUser: Cannot validate argument on parameter Name . The character length of the 36 arguments is too long. Shorten the character length of the argument, so it is fewer than or equal to 20 characters, and then try the command again.As a result, the easiest way to get around this problem is to create a local account and then use the Settings app to link it with a Microsoft account.
To link a local account with a Microsoft account, use these steps:
OpenSettings.
Click onAccounts.
Click onYour Info.
Click theSign in with your Microsoft account insteadoption.
Continue with the on-screen directions to connect your account to a Microsoft account.
After you complete the steps, the new account will connect to the specified Microsoft account.
Change local account type from PowerShell
To use PowerShell to change the account type from standard to administrator, use these steps:
OpenStart.
Search forPowerShell, right-click the top result, and select theRun as administratoroption.
Type the following command to change the account type to administrator and pressEnter:

In the command, make sure to changeUSER_ACCOUNTfor the account name you want to update.
Once you complete the steps, the local account will be added to the Administrators group, giving the user permission to make system changes and install or remove apps.
Delete local account on Windows 10 from PowerShell
To delete an account with PowerShell, use these steps:
OpenStart.
Search forWindows PowerShell, right-click the top result, and select theRun as administratoroption.
Type the following command to delete the user account and pressEnter:

In the command, make sure to changeUSER_ACCOUNT_NAMEwith the account name you want to remove.
After you complete the steps, the account will be deleted from the computer. However, the user account data will remain. If you want to delete both account and data, the easiest way is to delete the account using the Accounts page from the Settings app.
Create local account on Windows 10 from Computer Management
To create a new local account from Computer Management, use these steps:
OpenStart.
Search forComputer Managementand click the top result to open the app.
OpenSystem Tools > Local Users and Groups > Users.
Click theActionmenu and select theNew useroption.

Confirm the local account name in the User name setting.

(Optional) Confirm the full name and description of the account.
Create a password for the account.
Clear theUser must change password at next loginoption.
Check thePassword never expiresoption.
Click theCreatebutton.
Click theClosebutton.
Once you complete the steps, the Windows 10 local account will be created, and the user will be ready to access the account from the Sign in screen.
These instructions will create a Standard local account, if you want to make it Administrator, you have to double-click the account and add theAdministratorsgroup in the Member Of tab.
Delete local account on Windows 10 from Computer Management
To delete an account from Computer Management, use these steps:
OpenStart.
Search forComputer Managementand click the top result to open the app.
OpenSystem Tools > Local Users and Groups > Users.
Right-click the local account and select theDeletebutton.

Click theYesbutton.
After you complete the steps, the account will be deleted from the computer, but the profile folders and files will remain in the system.
Create local account from netplwiz
To create a local account on Windows 10 from netplwiz, use these steps:
OpenStart.
Search fornetplwizand click the top result to open the app.
Click theAddbutton.

Click theSign in without a Microsoft accountoption.

Click theLocal accountbutton.

Confirm the Windows 10 local account name in the User name setting.

Create a password for the account.
Confirm a hint for the account to help you remember the password.
Click theNextbutton.
Click theFinishbutton.
Once you complete the steps, the local account will be available on your Windows 10 computer.
These instructions will create a Standard local account, if you want to make it Administrator, select the account, click on Properties, and choose theAdministratoroption from the Group Membership tab.
Delete local account on Windows 10 from netplwiz
To delete an account on Windows 10 from netplwiz, use these steps:
OpenStart.
Search fornetplwizand click the top result to open the app.
Select the account and click theDeletebutton.

Click theYesbutton.
After you complete the steps, the local account will be removed from Windows 10. However, the profile folders and files will remain in the system.