A feature of Windows 11 called Storage Spaces allows you to join drives together to form a virtual drive with a bigger capacity, varying degrees of protection, and the potential to expand its size by adding more drives.
Storage Spaces provides five different types of resiliency options: parity, dual parity, two-way mirror, three-way mirror, and simple (no resiliency).
This tutorial will show you how to construct and manage a parity volume using Storage Spaces, which, like a RAID 5 level, needs a minimum of three disks. By copying data across several locations, it offers storage efficiency and protection against a single disk failure. You can swap out a failed disk, and the data will be restored using the parity data on the other drives. Since it provides the maximum storage space when combining security and storage, this choice is better suited to store long-term data (such as backups). However, performance is not optimal for files you use on a daily basis.
This tutorial will show you how to use Windows 11’s contemporary Storage Spaces experience to establish a parity space.
-
Create parity volume from Storage Spaces on Windows 11
-
Manage parity volume from Storage Spaces on Windows 11
Create parity volume from Storage Spaces on Windows 11
Use these procedures to create a parity space in Windows 11’s Storage Spaces:
OpenSettings on Windows 11.
Select “System.”
Select “Storage.”
Click the Advanced Storage Settings option under the Storage management section.
Select the Storage Spaces option.

To add a new Storage Pool configuration, click the Add button.

Verify the storage pool’s name.
In Windows 11, choose a minimum of three drives to establish a parity pool.

To create, click the button.
Verify the storage space’s name.
Indicate the space’s dimensions.
In order to be resilient, use the Parity option.

To create, click the button.
Assign a name to the drive.
Choose a letter to represent the drive.

For the file system, choose NTFS.
To format, click the button.
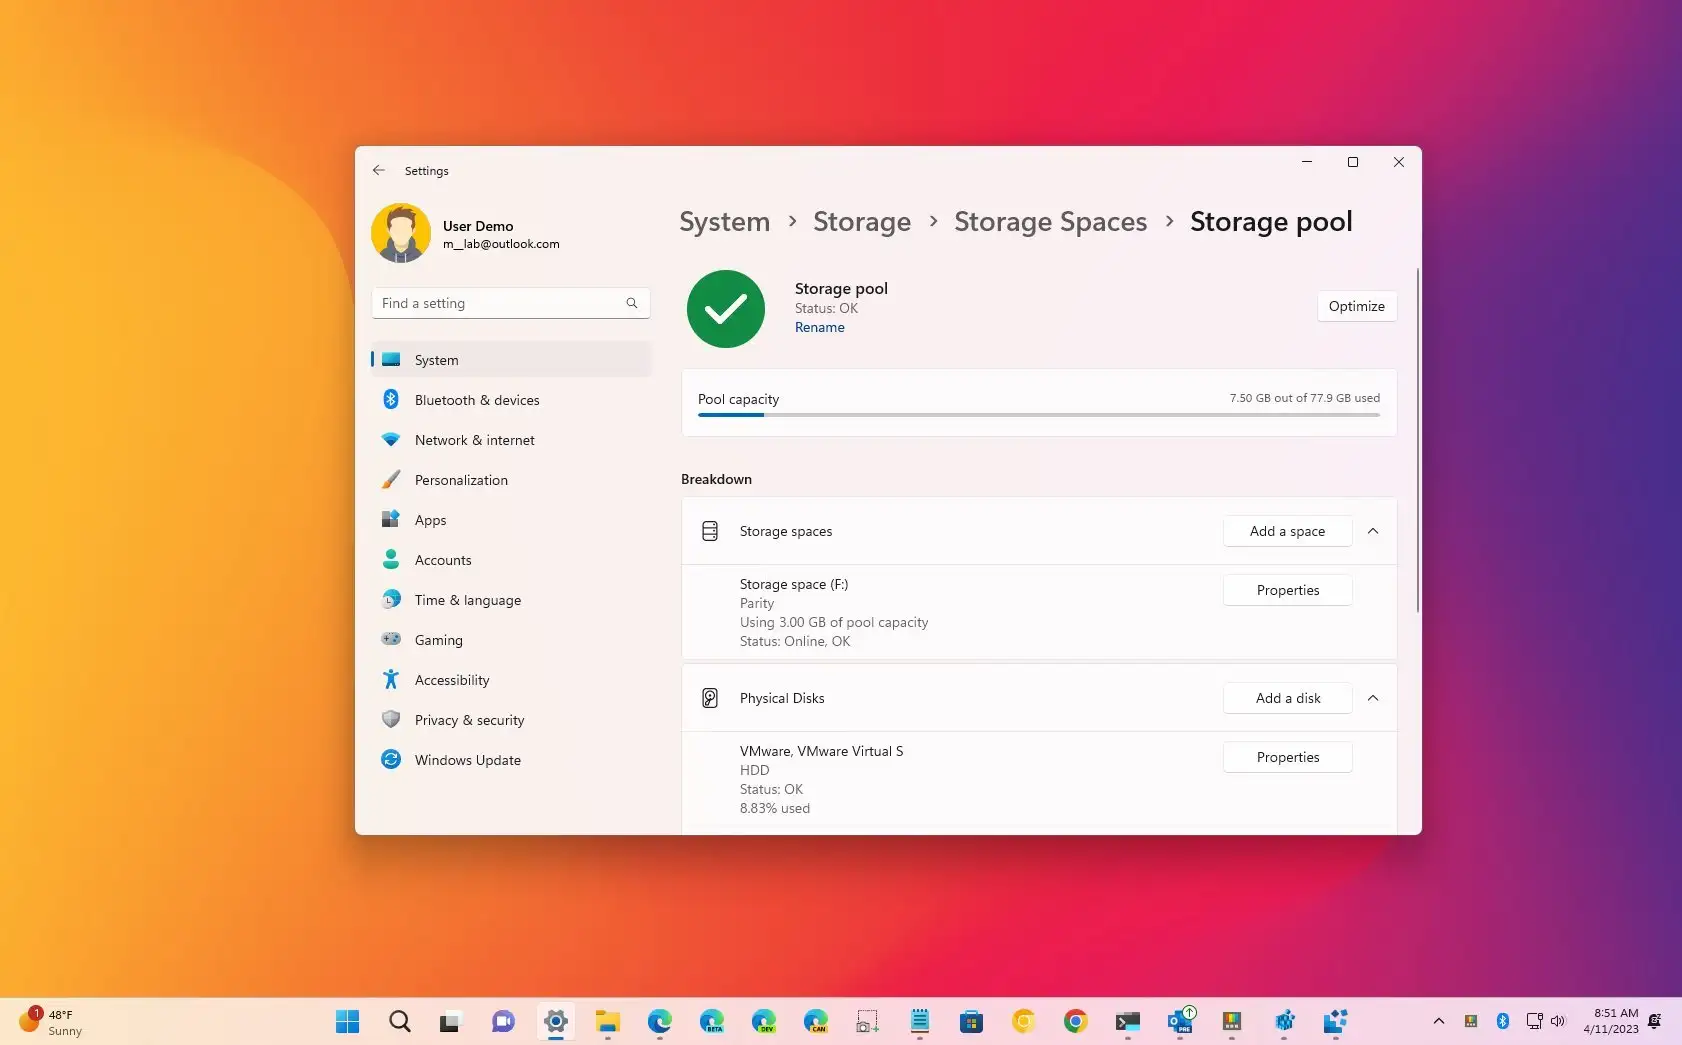
The new drive will show up in File Explorer after you finish the instructions. Storage and data will still be accessible in the event of a drive failure, but you will need to replace the hard disk in question because data loss will result after a second drive failure.
Manage parity volume from Storage Spaces on Windows 10
The Settings app allows you to control many more Storage Spaces features, like setting a pool and parity space. It can be extended, taken offline, deleted, spaces renamed, and pools destroyed.
Extend parity storage space
On Windows 11, use the following actions to increase a parity space:
Open the settings.
Select “System.”
Select “Storage.”
Click the Advanced Storage Settings option under the Storage management section.
Select the Storage Spaces option.
On the right, click the storage pool.

Click the “Add disks” option after selecting the Physical disks section.

Choose which drives to include in the pool.

If applicable, check the Optimize disk usage option.
Press the “Add” button.
Click the Properties button after selecting the Storage Spaces section and selecting the storage space to expand.

Click the “Extend” button under the “Size” section.

Verify the updated amount of logical storage.

To match the new size option, check the “Extendvolume” box.
Press the “OK” button.
The space and volume will expand to the size you designated once you have finished the stages. As soon as the storage starts to fill up, you will need to install another drive to free up the remaining space if you are utilizing a capacity number greater than the actual amount of space.
Take parity space offline or online
In Windows 11, follow these methods to bring a place online or remove it offline:
Open the settings.
Select “System.”
Select “Storage.”
Click the Advanced Storage Settings option under the Storage management section.
Select the Storage Spaces option.
On the right, click the storage pool.
Click the Properties button after choosing the storage space to take online or offline under the Storage Spaces section.
Under the Status section, click theTake offlinebutton to take the space offline on Windows 11.

To bring the space online, click the “Bring online” option.
Once you complete the steps, the space and volume will go offline or online, depending on the action.
Delete parity storage space
To delete a parity space, use these steps:
Open the settings.
Select “System.”
Select “Storage.”
Click the Advanced Storage Settings option under the Storage management section.
Select the Storage Spaces option.
On the right, click the storage pool.
Click the Properties button after selecting the storage space to be deleted under the Storage Spaces section.
Under the Delete section, click theDeletebutton.

Click theDelete Spacebutton.
After you complete the steps, the parity storage will be erased from the pool and any data previously stored in this storage space.
Rename parity storage space
To rename the parity space, use these steps:
Open the settings.
Select “System.”
Select “Storage.”
Click the Advanced Storage Settings option under the Storage management section.
Click theStorage Spacesbutton.
On the right, click the storage pool.
Under the Storage Spaces section, select the storage space to rename and click thePropertiesbutton.
Click theRenameoption.

Confirm the new name for the space.
Press the “OK” button.
Once you complete the steps, the storage space will reflect the new name you specified.
Delete storage pool
To delete the storage pool, you need to delete the spaces and remove the drives from the pool using these steps:
Open the settings.
Select “System.”
Select “Storage.”
Click the Advanced Storage Settings option under the Storage management section.
Click theStorage Spacesbutton.
On the right, click the storage pool.
Click the Properties button after selecting the storage space to be deleted under the Storage Spaces section.
Under the Delete section, click theDeletebutton.
Click theDelete Spacebutton.
On the storage pool page, under the Physical disks section, select a drive participating in the pool.
Click thePropertiesbutton.

Click thePrepare for removalbutton.
Click theRemovebutton.

Repeat steps8through11to remove all the drives from the pool.
Once you complete the steps, the pool will be automatically deleted from the drives. Now, you can remove the drives from the system, or you can create another pool.